Most people use VirtualBox to run VMs on their computers, and I believe VirtualBox is still a good way of doing it, but if you are using Windows 10 then you have the option of installing Hyper-V hypervisor to run VMs as well. I’m surprised this feature is built-in on Windows 10, and is very easy to install it without needing any extra components.
Table of Contents
Installing the Hypervisor
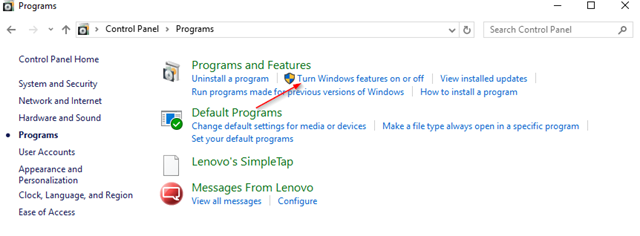
To install the hypervisor, click on the Start ![]() button, and search for Control Panel. in control panel click on programs, and then click on Turn Windows features on and off:
button, and search for Control Panel. in control panel click on programs, and then click on Turn Windows features on and off:
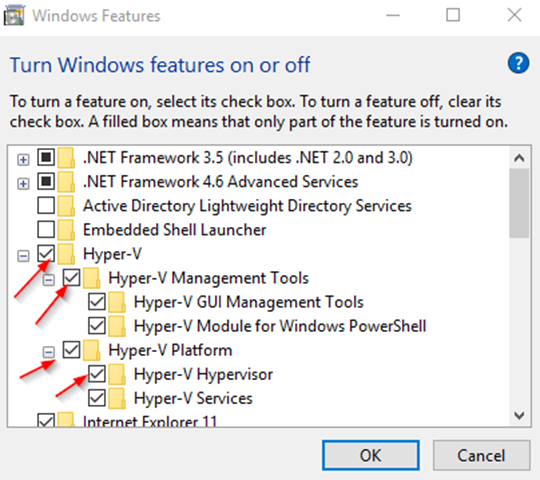
Then under Hyper-V check Hyper-V Management Tools, and Hyper-V Platform. Make sure all the sub-components are also checked:
Click on OK. and the Hyper-V features should get installed.
Enabling Intel VT
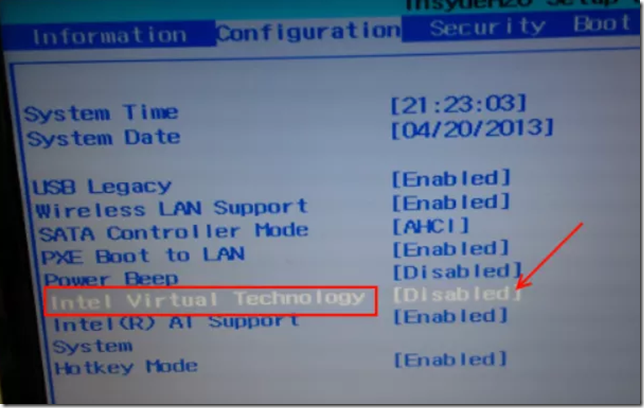
if you get any “unsupported” or similar error during the Installation, and you are using an “Intel” processor, make sure ‘Intel Virtual Technology” is enabled in the BIOS of your computer.
Managing your VMs
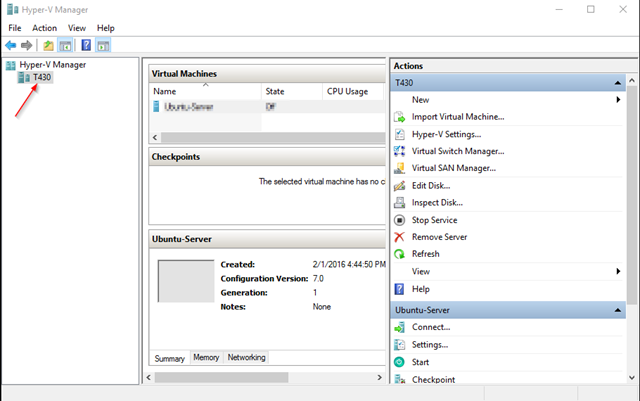
Now the Hyper-v Hypervisor should be installed on your computer. Open your Hyper-V Manager console:
Under “Hyper-V Manager” you should see the name of your computer, which is basically your Hyper-V server.
Creating a Virtual Switch
In order for your VMs to get to the Internet, you need to create a Virtual Switch in Hyper-V. if you have a laptop you might need to create two connections, one for the wireless interface, and the 2nd when your laptop is using an Ethernet cable.
To create the Virtual Switch, click on Virtual Switch Manager” on the action panel in your Hyper-V Manager:
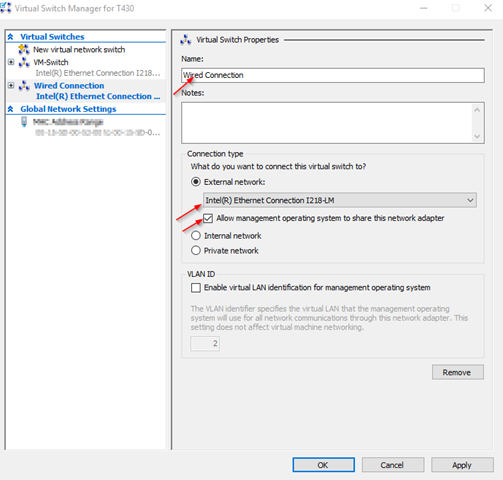
Then select “External” on the next window, then click on “Create Virtual Switch. On the following Window, under Name, give a name to you Virtual Switch, and then under Connection type, select your External Network. that could be your wireless connection if you are using a laptop or your Ethernet connection if you are using a desktop:
Make sure “Allow management operating system to share this adapter” is checked, and then click on “Apply” and then OK.
Creating your first VM
You can run any modern operating system from Hyper-V. I normally use Hyper-V to test things in Ubuntu CentOS or other Microsoft operating systems. to create a VM, just right-click your server name on your Hyper-V Manager, then select New and then click on “Virtual Machine:
Name your VM on the next screen:
Leave the storage location as default if you are storing your VMs on the default path. otherwise point it to a different location. click Next when you are done choosing the location.
On the next screen choose the generation of the virtual machine that you want to use. if you are installing any Linux distribution, choose the 1st generation, and if you are installing any Windows operating system like Windows server 2012 or 2016, choose the 2nd generation:
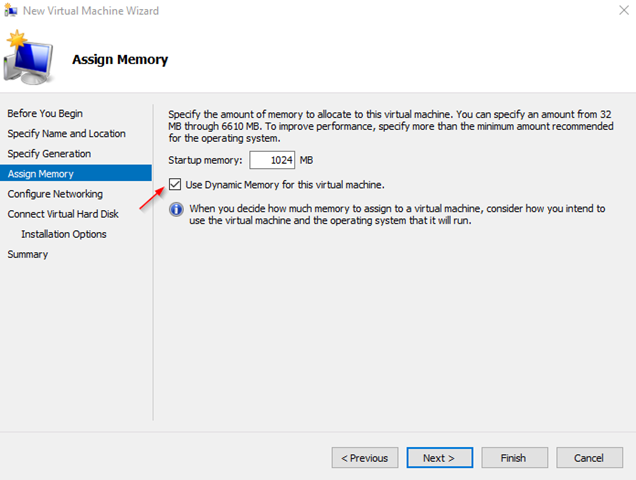
Click on Next and choose the memory you want to allocate to this VM. you can also let the system choose the amount of memory the system will use by checking the “ Use dynamic memory for this virtual machine:
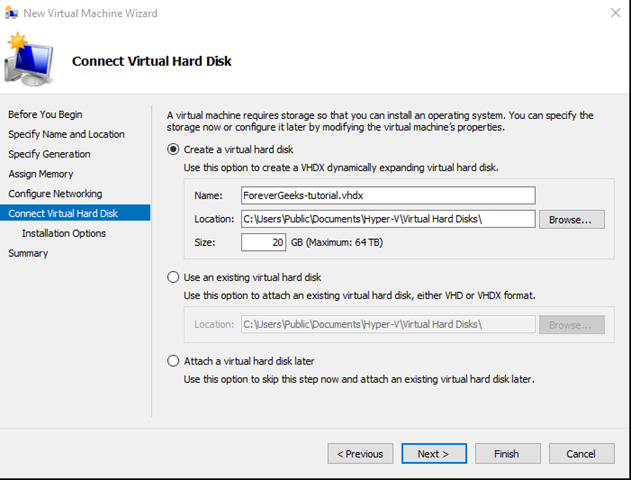
Then on the following screen choose the Connection you want to use. this is the Virtual Network connection we created above. select the connection and click on Next. specify the name, and the amount of space you want to allocate to this VM on the next screen:
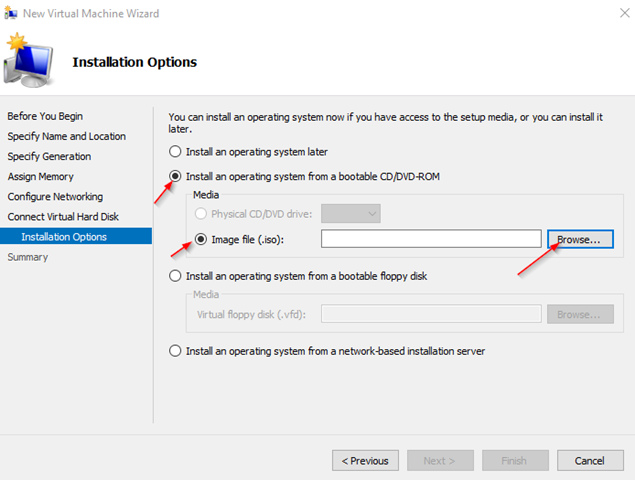
then click on Next. Choose your installation options in the next screen. if you have have an .ISO image of the operating system you want to install choose it here:
After that, click on Finish.
Conclusion
Hyper-V is a very good hypervisor, is very stable and simple to use. We’ve been using it in our production environment for the last 5 years, and never had a problem. All our hyper-V hosts run in a cluster using two SANs as storage.
Was this article helpful?
Your feedback helps us improve our content.
15 people found this helpful!


