Joomla is a popular content management system for building websites. Joomla is my preferred platform for building business websites that don’t get updated as often as a blog. if you are planning to publish content on your website frequently, then maybe using WordPress will be a better option for you. In this guide I will walk you step by step on how to install and configure the latest release of Joomla which at the time of this writing is version 3.
Table of Contents
Prerequisites
Joomla requires the LAMP stack to run. Here are the technical requirements for installingJoomla 3:
- PHP 5.6 or higher
- MySQL 5.5 or higher
- Apache 2.4
You can install Joomla in other web servers like Ngnix and IIS but that’s beyond the scope of this tutorial. I will use Ubuntu LTS Server 14.04 for this guide with SSH and Root access to the server. You can install Joomla in any other Linux distribution as long as the requirements listed above are met, but all the commands used in this tutorial are based on Ubuntu.
Getting the server ready
I assume your Ubuntu Server is already online, and fully updated. If you haven’t installed the LAMP stack on the server yet, the easiest way to do it is using the tasksel script. Type these commands one by one on terminal sudo apt-get install tasksel and then type sudo apt-get update && sudo tasksel install lamp-server follow the the instructions to enter a password for your MySQL server. after your installation finishes, you should have a basic LAMP server installed. type in the IP address of your server in the browser to make sure your Apache is running.
If you are hosting multiple websites from your server, then you most likely need to create a DNS based VirtualHost. go ahead and create it now. in Ubuntu, the VirtualHost files are located at “etc/apache2/sites-available/ so let’s create the virtual host. sudo nano /etc/apache2/sites-available/nameofyourhost.conf (e.g. sudo nano /etc/apache2/sites-available/forevergeeks.conf ) copy and paste the following text to your VirtualHost ( don’t forget to change the text to reflect your configuration )
# Place any notes or comments you have here
# It will make any customisation easier to understand in the weeks to come# domain: forevergeeks.com
# public: /var/www/joomla<VirtualHost *:80>
# Admin email, Server Name (domain name) and any aliases
ServerAdmin nelson@forevergeeks.com
ServerName forevergeeks.com
ServerAlias www.forevergeeks.com# Index file and Document Root (where the public files are located)
DirectoryIndex index.php
DocumentRoot /var/www/joomla/
<Directory />
Options -Indexes
AllowOverride All
</Directory></VirtualHost>
Enable the VirtualHost with this command sudo a2ensite nameofyourvirtualhost (e.g sudo a2ensite forevergeeks.conf ) enable the Mod_Rewrite module with this command sudo a2enmod rewrite and then reload apache sudo service apache2 reload
Creating the database
Login to your MySQL server and create the database. mysql –u root –p then create the database create database nameofyourdatanase; ( e.g create database joomla ; ) if you don’t want to use the MySQL root password to install joomla, you can create a specific user in MySQL.
CREATE USER ‘newuser’@’localhost’ IDENTIFIED BY ‘password’; (e.g create user ‘forevergeeks’@’localhost’ identified by ‘forevergeeks’; ) then grant the user full access to the joomla database GRANT ALL PRIVILEGES ON databasename.* TO ‘user’@’localhost’; (e.g grant all privileges on joomla.* to ‘forevergeeks’@’localhost’; ) then type flush privileges; and exit.
Downloading Joomla
Let’s create the Web root directory for joomla sudo mkdir /var/www/joomla/ then download the latest package. the latest English Joomla package is 3.4.8 . let’s download it on the server with the following command cd /var/www/joomla/ && sudo wget https://github.com/joomla/joomla-cms/releases/download/3.4.8/Joomla_3.4.8-Stable-Full_Package.zip then unzip it sudo apt-get install unzip && sudo unzip Joom*.zip give apache full access to your web root directory sudo chown –R www-data:www-data /var/www/joomla/
Installing Joomla
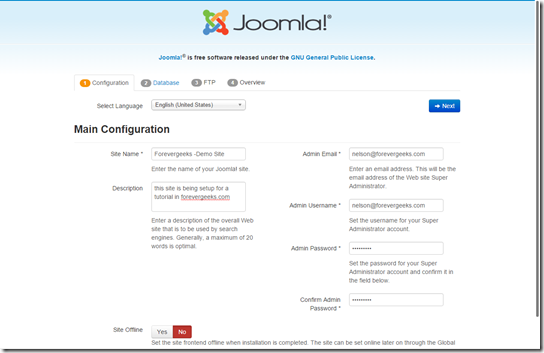
Type in your domain name in your browser, and the Joomla installation wizard should come up:
Enter the Site Name, Description, admin email, username, and password, etc. and click on Next:
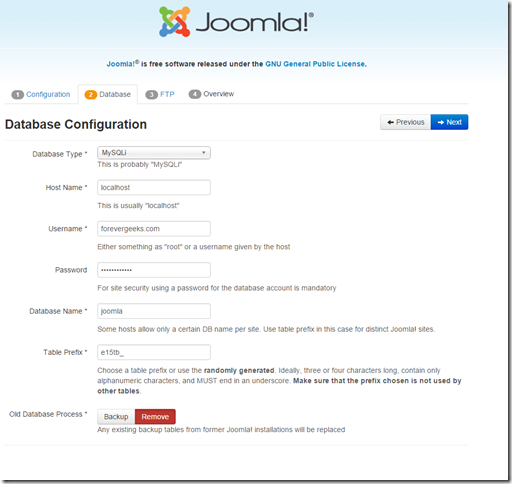
For the database type choose MySQLi and hostname most likely is “localhost”. enter the username that has access to the database, and the password. Table prefix should be left as default. if you don’t have any existing database select “Remove” after you are done entering the database info click on Next.
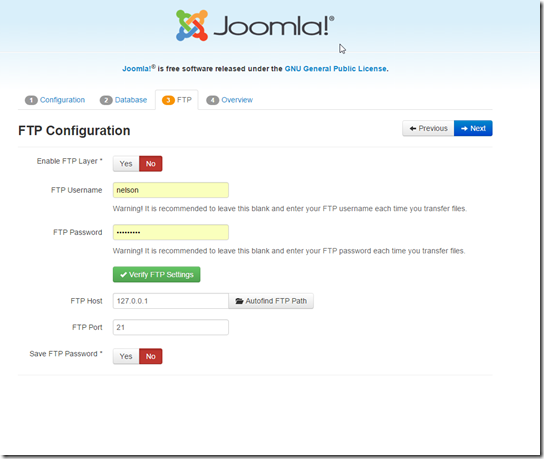
IF you want to setup FTP in your site, do it here. if you don’t, then just click Next.
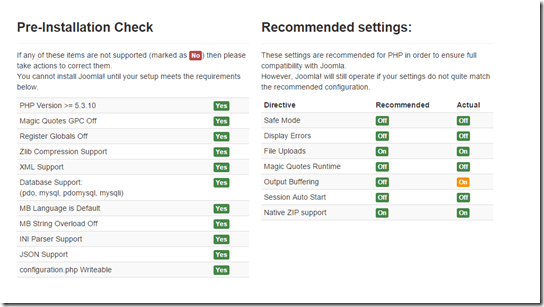
Overview your installation. Make sure your pre-installation check is all green:
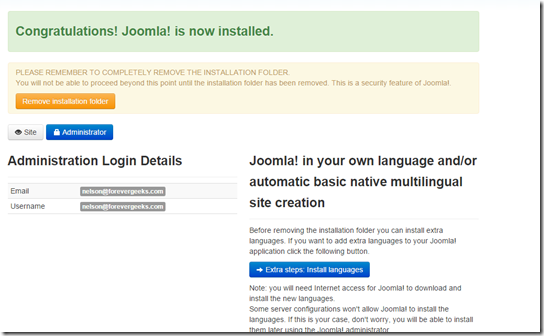
Click on Install. Congratulations, Joomla! is not installed.
click on Remove Installation folder that’s it. you can now login to your site!
Joomla SEO optimization
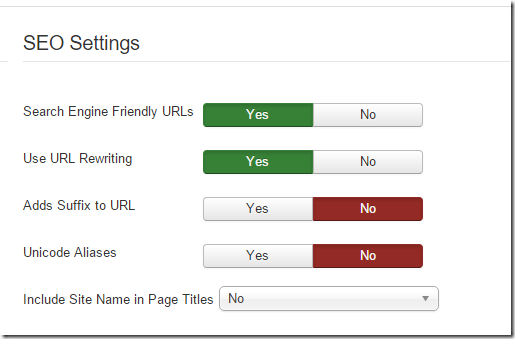
There are a couple of settings you should turn on under the Global Configuration to help your site rank better in search engines. once you login to the admin panel, click on Systems and then Global Configuration then under SEO Settings make sure Search Engine Friendly URLs and Use URL Rewriting are set to Yes.
If you get errors trying to access pages on the site after making these changes, make sure your .htaccess file is present in your Joomla web directory.
Mail Settings
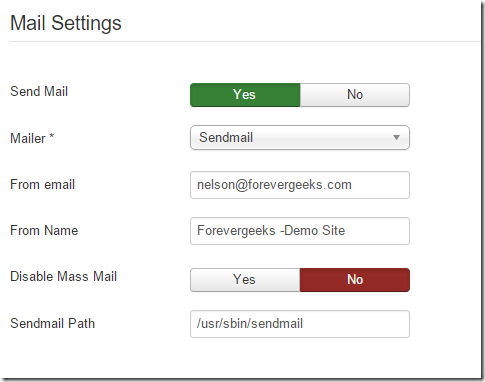
Under mail settings you can configure how emails are sent from your site. if sendmail is installed in your server, then leave the default settings:
IF you want to use Gmail as your email host, then choose SMTP from the Mailer dropdown menu, and follow this guide to setup Gmail as your SMTP host.
Conclusion
Joomla is a robust and easy to use content management system and you can use to to build all types of websites. I have built professional business sites, music sites, social sites, and many other types of sites in Joomla without facing too many problems. I hope this guide was helpful to you, and if you have any question, please use the comment section below. thank you!
Was this article helpful?
Your feedback helps us improve our content.
4 people found this helpful!


