Nagios is a very popular open source network monitoring system. with Nagios you can monitor your network resources, and receive email alerts or SMS messages on your cell phone anytime those resources run low or when any of your network devices go down. Nagios was designed to run on Linux, it cannot be installed in any other operating system as far as I know.
In this tutorial I will guide you step by step how to install and configure Nagios, then we will set to monitor a Windows and Linux server, then we will setup nagvis to create live maps that you can display on a computer monitor or TV screen. Please follow the guide step by step to complete it successfully, and if you encounter any issue please use the comment section to ask for help.
Table of Contents
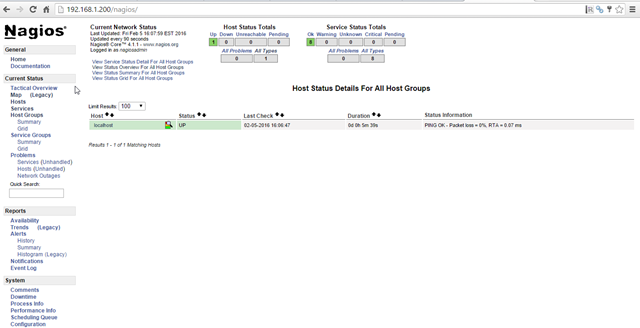
Nagios built-in map:
A custom live map I built to display on a 1920 x 1080 TV screen:
You can build as many live maps as you need to from Visio drawings or any other custom image using Nagvis.
OK. let’s begin.
Note: This tutorial was tested in Ubuntu only, but taking into account that we will be compiling almost everything from source, this instructions might work in other distributions like CentOS and SUSE linux as well.I’ll use the default ‘sudo” account that is created when you install Ubuntu, but if you want to create a different account to setup Nagios is up to you.
Prerequisites
In this tutorial I assume that you are familiar with Linux, preferably Ubuntu, and that you have an Ubuntu server already installed with Internet access, and fully patched. if you haven’t installed the LAMP stack on the server yet, do it now. use these commands to do it. sudo apt-get update && sudo apt-get install tasksel then install the LAMP server with this command sudo tasksel install lamp-server follow the screen instructions and enter a MySQL password. verify apache is running by typing the IP address of your server on the browser. you should get the Apache default page.
[adinserter name=”Block 1″]
Create the Nagios user and group
Create a nagios user and a group. both with the same name.
sudo addduser nagios
sudo addgroup nagios
sudo usermod –a –G nagios nagios
Install the dependencies
Let’s install all the dependencies we will need to install Nagios with this command: sudo apt-get install build-essential libgd2-xpm-dev openssl libssl-dev xinetd apache2-utils unzip sendmail
Install Nagios
Download the latest Nagios tar file from this URL https://www.nagios.org/downloads/nagios-core/thanks/?t=1454682862 at the time of this writing the latest release is 4.1.1. Download it on the server using this command: cd /opt/ && sudo wget https://assets.nagios.com/downloads/nagioscore/releases/nagios-4.1.1.tar.gz
Extract the tar file sudo tar xvf nagios-*.tar.gz then switch to the Nagios directory cd nagios* and configure Nagios with this command: sudo ./configure –with-nagios-group=nagios –with-command-group=nagios –with-mail=/usr/sbin/sendmail then type, sudo make all to compile it. Now type these commands one by one on terminal:
sudo make install
sudo make install-commandmode
sudo make install-init
sudo make install-config
sudo /usr/bin/install -c -m 644 sample-config/httpd.conf /etc/apache2/sites-available/nagios.conf
Add the Apache web server user to the Nagios group we created above:
sudo usermod -G nagios www-data
Install the Nagios Plugins
You can find the Nagios plugins in this location at the Nagios website http://nagios-plugins.org/download/?C=M;O=D at the time of this writing the latest plugins release is 2.1.1. Download the plugins on your server on your home directory using this command wget http://nagios-plugins.org/download/nagios-plugins-2.1.1.tar.gz
extract them tar xvf nagios-plugins-*.tar.gz switch to the plugins directory cd nagios* then configure the plugins sudo ./configure –with-nagios-user=nagios –with-nagios-group=nagios –with-openssl compile them sudo make and finally install them sudo make install
Install NRPE
You can fine the latest NRPE files at this location http://sourceforge.net/projects/nagios/files/nrpe-2.x/ the latest release at the time of this writing is 2.15. download the file cd ~ && wget http://downloads.sourceforge.net/project/nagios/nrpe-2.x/nrpe-2.15/nrpe-2.15.tar.gz extract the file tar xvf nrpe-2-15.tar.gz change directory cd nrpe* and then configure nrpe with this command sudo ./configure –enable-command-args –with-nagios-user=nagios –with-nagios-group=nagios –with-ssl=/usr/bin/openssl –with-ssl-lib=/usr/lib/x86_64-linux-gnu now type these commands on terminal one by one:
make all
sudo make install
sudo make install-xinetd
sudo make install-daemon-config
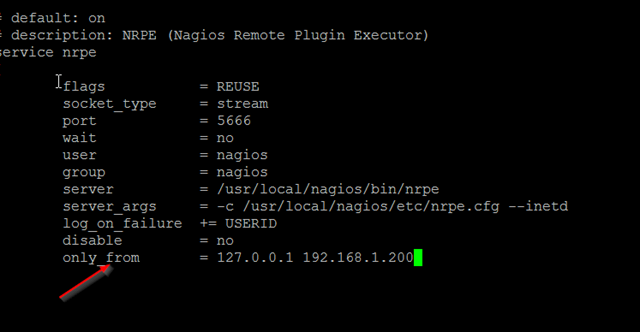
Modify the xinetd startup file in order for the NRPE server to communicate with Nagios:
sudo nano /etc/xinetd.d/nrpe
Add the IP address of your Nagios server at the end of the only_from line:
Save the file, and then restart the service sudo service xinetd restart
Configure Nagios
Using nano open the Nagios configuration file: sudo nano /usr/local/nagios/etc/nagios.cfg and find these lines:
#cfg_dir=/usr/local/nagios/etc/servers
#cfg_dir=/usr/local/nagios/etc/printers
#cfg_dir=/usr/local/nagios/etc/switches
#cfg_dir=/usr/local/nagios/etc/routers
Uncomment all the devices you will be monitoring, and save the file.
Now create the directories for all the devices you will be monitoring in each of those paths above: for example type sudo mkdir /usr/local/nagios/etc/servers for the servers.
Configure E-mail contacts
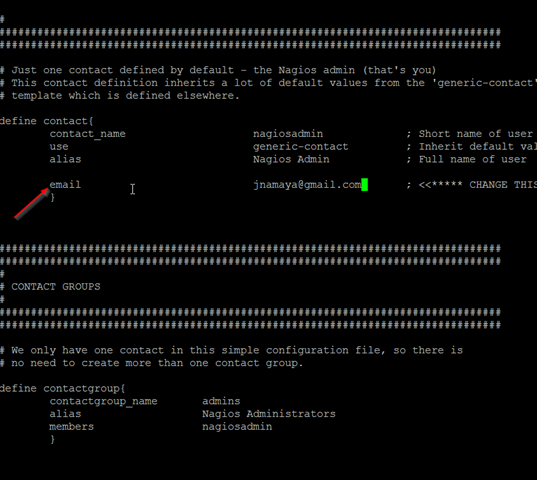
In order to receive notifications from Nagios you need to configure the contacts. open the contact configuration file, and add the email address you want to receive the emails from Nagios:
If you want to add more people to the notification list, just add their contact info here.
save the file, and exit.
Configure the NRPE command
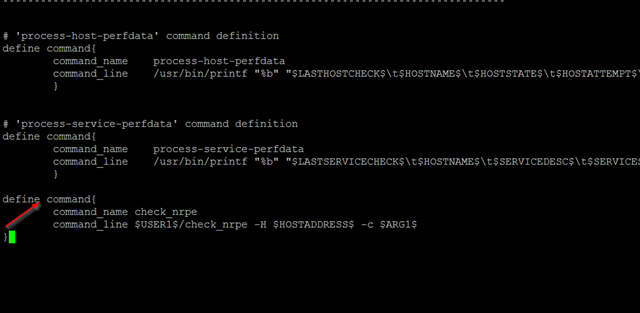
Open the command configuration file sudo nano /usr/local/nagios/etc/objects/commands.cfg and add the following command at the end of the file:
define command {
command_name check_nrpe
command_line $USER1$/check_nrpe -H $HOSTADDRESS$ -c $ARG1$
}
save the file and exit.
Configure Apache
Enable mod_rewrite sudo a2enmod rewrite and enable the CGI module sudo a2enmod cgi
Create the default Nagios account to login to the Nagios front end using this command: sudo htpasswd -c /usr/local/nagios/etc/htpasswd.users nagiosadmin enter the password when prompted:
Create a symbolic link from the nagios.conf file to the apache enabled sites:
sudo ln -s /etc/apache2/sites-available/nagios.conf /etc/apache2/sites-enabled/
Start Nagios and restart Apache: sudo service nagios start and restart apache sudo service apache2 restart if you want to start Nagios at every server reboot, create this symbolic link sudo ln -s /etc/init.d/nagios /etc/rcS.d/S99nagios
Login to Nagios
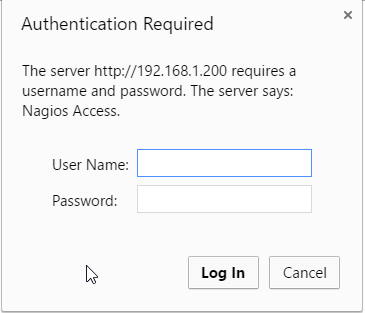
Kudos! we have successfully installed, and configured Nagios. type the IP address of your Nagios server on your browser with the /nagios sub-directory like this http://ipaddress/nagios and you should get the login prompt:
Type the user name we created above “nagiosadmin” and the password you chose.and you should land in your newly built Nagios web page.
Get familiar with the Interface if this is the first time you are installing Nagios.
Monitoring a Windows Host
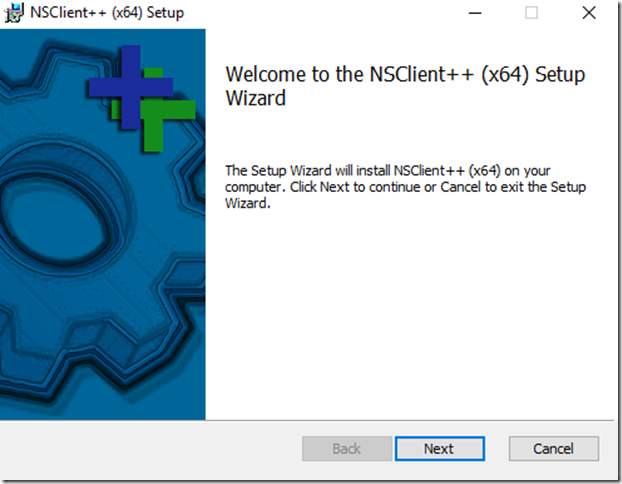
In order to monitor a Windows host either a server or desktop, we need to download and install NSclient++ in that computer. you can download the latest NSClient++ from this URL https://www.nsclient.org/download/ download it, and execute it on the server you want to monitor. I’ll add a Windows 2016 server to my Nagios server. after executing the NSClient++ you should get the installation wizard:
Click on Next.
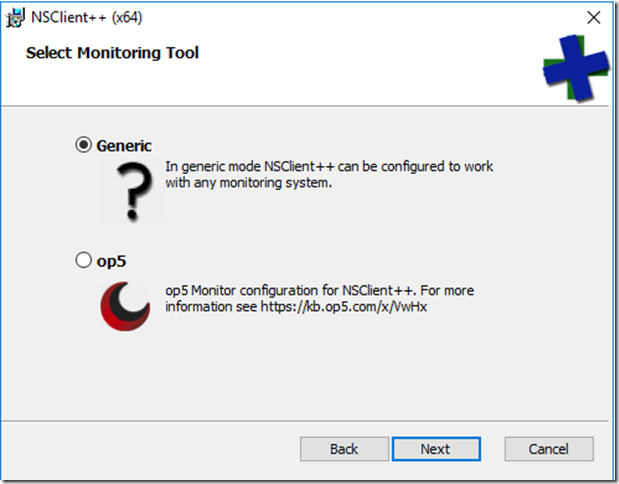
Choose Generic on the next screen:
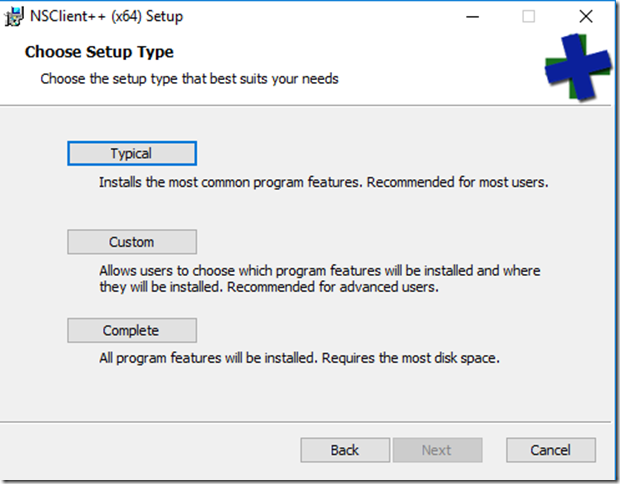
On the next screen click on “Complete” if you are concerned about security, and what to pick in choose what modules and scripts to install, feel free to choose the custom option.
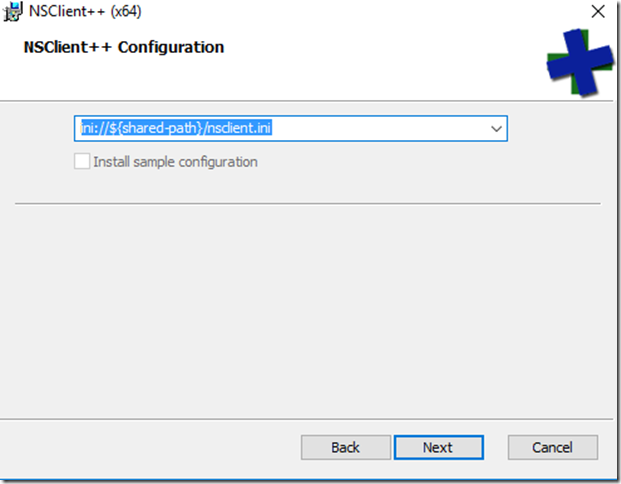
Click on Next in the following screen:
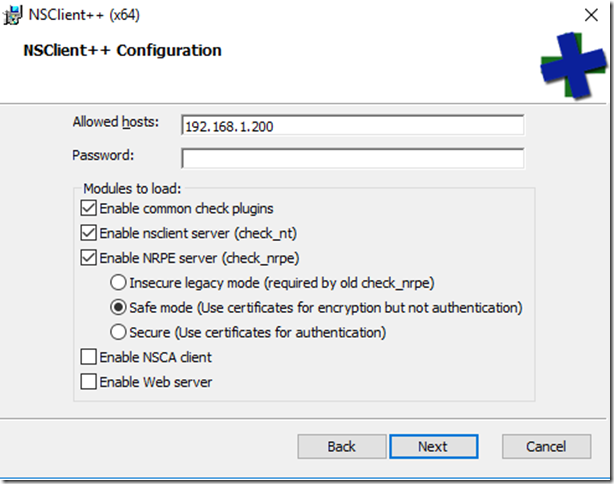
On the next screen enter the IP address of your Nagios server, and a password if you need to use a password:
click on Next after you are done making your choices. then click on Install in the next screen.
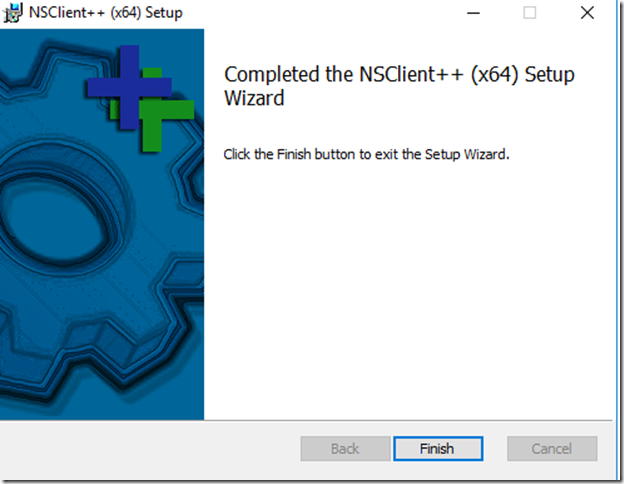
then click on Finish.
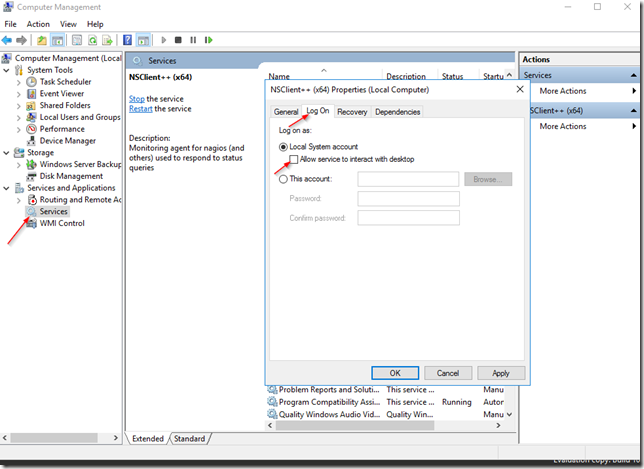
After you finish installing the client, go to your server Services and right-click on NSClient++ service, and click on the Log On tab and check the Allow service to interact with the Desktop option:
Click on OK and make sure the service is running. you are done installing NSClient++ on the server.
Setting up the Windows config file
Let’s create the configuration file the server. I will call my server “dcforevergeeks.com” but preferably, you should adopt a naming convention for your configuration files to keep them organized. create the file using nano with this command: sudo nano /usr/local/nagios/etc/servers/dcforevergeeks.com.cfg
add this information to the file. ( change it to your server information )
############## Windows Host Group ################
define hostgroup{
hostgroup_name windows-servers ; The name of the hostgroup
alias Windows Servers ; Long name of the group
}
############### My First Windows Server######################
define host {
use windows-server
host_name dcforevergeeks.com
alias windows server for this forevergeeks.com tutorial
address 192.168.1.2
contact_groups admins
}
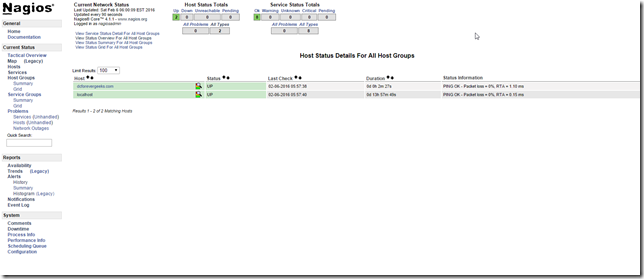
Reload the nagios service sudo service nagios reload and your server should show up under “Hosts” in Nagios:
Right now Nagios is just pinging the server, but let’s monitor the server load, Uptime, memory usage, CPU load, and Hard drive space on that server as well. Open your server configuration file and add this information ( again change it to reflect your server )
define service{
use generic-service
host_name dcforevergeeks.com
service_description Uptime
check_command check_nt!UPTIME
contact_groups admins
}
define service{
use generic-service
host_name dcforevergeeks.com
service_description CPU Load
check_command check_nt!CPULOAD!-l 5,80,90
contact_groups admins
}
define service{
use generic-service
host_name dcforevergeeks.com
service_description Memory Usage
check_command check_nt!MEMUSE!-w 80 -c 90
contact_groups admins
}
define service{
use generic-service
host_name dcforevergeeks.com
service_description C: Drive Space
check_command check_nt!USEDDISKSPACE!-l c -w 80 -c 90
contact_groups admins
}
Reload the Nagios service sudo service nagios reload and those services should show up under your host now. if you get any error while reloading the Nagios service, check for typos.
Nagios is like a Lego, you can do with it whatever you want, so this is just a basic example on how to monitor a Windows host. here is my entire configuration file for your reference:
define hostgroup{
hostgroup_name windows-servers ; The name of the hostgroup
alias Windows Servers ; Long name of the group
}
define host {
use windows-server
host_name dcforevergeeks.com
alias windows server for this forevergeeks.com tutorial
address 192.168.1.2
contact_groups admins
}
define service{
use generic-service
host_name dcforevergeeks.com
service_description Uptime
check_command check_nt!UPTIME
contact_groups admins
}
define service{
use generic-service
host_name dcforevergeeks.com
service_description CPU Load
check_command check_nt!CPULOAD!-l 5,80,90
contact_groups admins
}
define service{
use generic-service
host_name dcforevergeeks.com
service_description Memory Usage
check_command check_nt!MEMUSE!-w 80 -c 90
contact_groups admins
}
define service{
use generic-service
host_name dcforevergeeks.com
service_description C: Drive Space
check_command check_nt!USEDDISKSPACE!-l c -w 80 -c 90
contact_groups admins
}
Monitoring a Linux Host
We will monitor our Linux Host using NPRE. on the Linux host we want to monitor run these commands: refresh the repos sudo apt-get update and then install the nagios plugins and the NPRE server: sudo apt-get install nagios-plugins nagios-nrpe-server lets modify the npre config file to allow our Nagios server to connect to this server sudo nano /etc/nagios/nrpe.cfg find the line ‘allowed_hosts=127.0.0.0 and add the IP address of your Nagios server so the entire string looks like this ‘allowed_hosts=127.0.0.0,192.168.1.200” save the file and exit. restart the NPRE service sudo service nagios-nrpe-server restart
Setting Up the Linux Host config file
Let’s create the Linux Host configuration file like we did for the Windows Hosts. type this in terminal to create the file. remember modify the info according to your needs sudo nano /usr/local/nagios/etc/servers/linuxforevergeeks.com.cfg and add the following info:
define host {
use linux-server
host_name linuxforevergeeks.com
alias Linux server for this forevergeeks.com tutorial
address 192.168.1.10
contact_groups admins
}
define service {
use generic-service
host_name linuxforevergeeks.com
service_description PING
check_command check_ping!100.0,20%!500.0,60%
}
define service {
use generic-service
host_name linuxforevergeeks.com
service_description PING
check_command check_ping!100.0,20%!500.0,60%
}
define service {
use generic-service
host_name linuxforevergeeks.com
service_description SSH
check_command check_ssh
notifications_enabled 0
}
define service{
use generic-service
host_name linuxforevergeeks.com
service_description Total Processes
check_command check_nrpe!check_total_procs
}
define service{
use generic-service
host_name linuxforevergeeks.com
service_description Root Partition
contact_groups admins
check_command check_nrpe!check_disk
}
define service{
use generic-service
host_name linuxforevergeeks.com
service_description Load
check_command ccheck_nrpe!check_load!5!10
}
In the configuration file above we setup to monitor a Ping, Load, Number of processes, SSH, Disk space:
Installing and Configuring Nagvis
Setting up live maps
Conclusion
Was this article helpful?
Your feedback helps us improve our content.
59 people found this helpful!


